
Kubernetes
2022-10-2 About 9 min
# Kubernetes
![]()
# Glossary
- Kubernetes: Greek for captain, pilot
- k8s: hacker talk for Kubernetes, 8 characters between k and s (opens new window)
- pod: a group of whales
- Helm: steering wheel of a boat
- cluster: a term used for a whole bunch of servers
# In the beginning...
Kubernetes was started as a side project by Joe Beda, Brendan Burns, and Craig McLuckie while working at Google. It was originally planned to be an improved version of Borg, the system that manages (still does) Google's infrastructure, a lot of ideas came from that system.
They filled in gaps that the up-and-coming Docker did "wrong", they focussed on multi-server deploys on a large scale where for Docker this was an afterthought.
In 2015 Kubernetes 1.0 was released and Google worked with the Linux foundation to found a new organisation: the CNCF (Cloud Native Computing Foundation), to maintain Kubernetes and other projects onwards. While Kubernetes didn't make it into the core Google infrastructure, it did become a big part of Google Cloud Platform in the form of GKE (Google Kubernetes Engine), a widely used Google Cloud service. Big companies joined in to support the CNCF, including Microsoft, IBM, Red Hat, Amazon, and many more. Making Kubernetes a meeting place for all competing cloud and Linux companies, a place where they could work together.
Kubernetes was quickly adopted by medium to big companies to deploy containers as it solved a few pain points Docker (and later Docker's multi-server attempt Swarm) had:
- Storage using automatic network attached storage
- Inter container networking using an "overlay network"
- Automatic load balancing & rolling updates
- Automatic scaling
- Muli-server deploys
# (More or less) Cloud-agnostic
But maybe one of the most important feature is that it solved a pain point of the cloud. Many cloud systems offered these services but they all were different. Because Kubernetes had a big community it provides a standard API to deploy containers, making it easy to switch between cloud providers or exchange configurations. Kubernetes abstracts many things the cloud provider does for us away into standard definitions (well... tries to...).
# What is Kubernetes?
Well..Kubernetes doesn’t exist...
"Kubernetes is the new Linux"
Just like Linux is a name we give to a whole OS while it is just the tiny base the same is true for Kubernetes! Kubernetes are many moving parts combined together. Kubernetes also has distros just like Linux. These distributions come with a few pre-installed components. Kubernetes provides an API to the end user for common tasks that are involved with large application deployments. But underneath it gets help from a container engine, a storage system, an overlay networking system, etc. Other things are then done by Kubernetes itself... like scheduling, load balancing, scaling, etc. Let's not get too deep into that for now... We'll guide you through the basics of using Kubernetes!
Let's look at some typical cloud setup without Kubernetes: (hint: doesn't this look like a simpler version of the image we open every class with??)
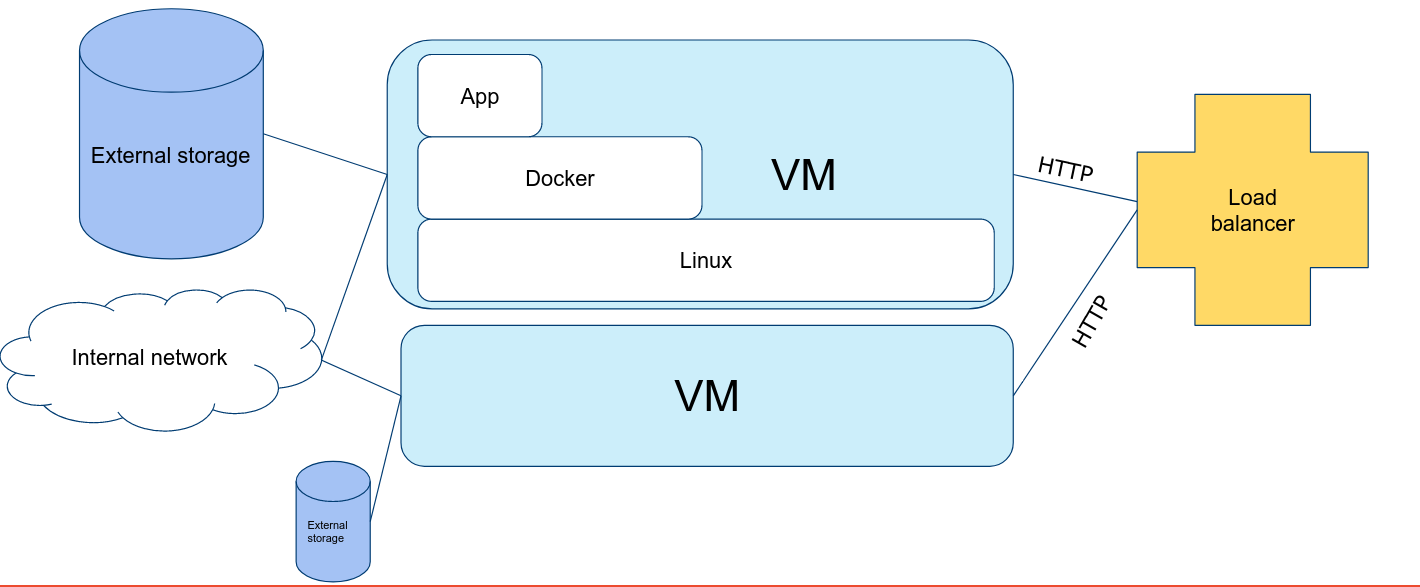
We see that we have multiple machines to loadbalance under, we have an internal network and storage. We run all our apps in Docker containers here. If you had to set this all up yourself you would have to do a lot of work. But Kubernetes does this for you! Further ahead we will compare this to what it is in Kubernetes.
# Distros
In need of a Kubernetes distro? It comes in many flavours! Some are bound to a specific cloud platform, others you can self host.
Some Kubernetes distros come with the basics and leave the rest to the user to install. Others are ready out of the box with many components installed, while this sounds easy it leaves not much freedom to chose your tooling of leave out parts you do not use which slow down deployment.
Cloud:
All the big cloud providers offer Kubernetes as a service which are tied into the cloud platform for loadbalancing, storage etc.
- Google Kubernetes Engine (opens new window)
- Amazon Elastic Kubernetes Service (opens new window)
- Azure Kubernetes Service (opens new window)
- DigitalOcean Kubernetes (opens new window)
- Oracle Container Engine for Kubernetes (opens new window)
- Linode Kubernetes Engine (opens new window)
- IBM Cloud Kubernetes Service (opens new window)
and many more...
On-premise/Self-Hosted:
You can self-host Kubernetes on premise. Some companies prefer to also self-host in the cloud to have full control over the setup where a cloud offered managed Kubernetes locks you out of the deep inner workings.
- Kubeadm (opens new window) - open source and supported by the CNCF
- Typhoon (opens new window)
- Kubespray (opens new window)
- Kubermatic (opens new window)
- Kublr (opens new window)
- VMWare Tanzu (opens new window)
- RedHat OpenShift (opens new window)
- K3s (opens new window) - Technically a fork of Kubernetes
Development (local):
When working on a local machine for testing and deployment we have a few options, most of them are however limited to a single server and should not be used in production.
- kind (opens new window) (Kubernetes in Docker) - open source and supported by the CNCF
- Minikube (opens new window) - open source and supported by the CNCF
- MicroK8s (opens new window)
- Docker Desktop (opens new window)
- CRC (opens new window) (for OpenShift)
# Working with Kubernetes
Now we kind of know what Kubernetes is we can get to work! Want to try it all out already? Then just jump ahead to Clusters to set up your local kind cluster.
But first we have to know how to work with Kubernetes! For this we will learn how to use the CLI tool kubectl and take a look on how resources/configurations/... are defined in Kubernetes.
Isn't there a GUI? Yes, there is... but do not use it. The Kubernetes Dashboard is not well maintained (lacks many features) and often is a nice way for attackers to hack into your cluster when exposed on the internet. We also cannot automate things with it like we would do in a CI/CD deployment. So we will not use it.
# kubectl
Before we get to look at what is inside Kubernetes we have to learn how to access it all.
We have the command line utility kubectl which is the main way to interact with Kubernetes. It is a CLI tool that can be used to deploy, manage, and debug applications in a Kubernetes cluster. It is the main tool for interacting with Kubernetes and is used to deploy and manage applications.
How it is pronounced is a mystery (opens new window)... Let's just stick with cube cee-tee-el or cube control for now...
 (my favorite “mis”pronounciation is kube cuddle)
kubectl is a tool to create/read/update/delete (CRUD is everywhere...) everything in Kubernetes. But it does more that that!
kubectl create -f file.yaml # create a resource from a file definition

kubectl apply -f file.yaml # create or updates (if exists!) a resource from a file definition

kubectl delete <resource type> <name> # delete a resource

kubectl get <resource type> # get a list of resources of a certain type
1
2
3
4
5
6
7
2
3
4
5
6
7
Let's try some out:
kubectl get pods # get a list of all pods
kubectl get nodes # get a list of all nodes
kubectl get services # get a list of all services
1
2
3
2
3
But it can also understand you Kubernetes better!
kubectl explain <resource type> # get a list of all resources of a certain type
kubectl describe <resource type> <name> # explains everything about a specific resource in your cluster
1
2
2
Let's try looking at some explain commands:
kubectl explain pod
kubectl explain node
1
2
2
A quick browse in the documentation also gets you into the helper commands:
kubectl run <name> --image=<image> # create a pod with a container running an image
1
This creates a pod with an image. However it leaves no replicatable configuration, it should only be used for testing. What we want is a collection of configurations of what is running in the cluster (preferably defined as-Code, in a Git repo). So we know what exactly is running and that we can re-deploy in case of failure. Tools like AgroCD (opens new window) can even automate this proccess when linked to a Git repo.
# What's in a YAML?
Everything in Kubernetes is resource. A resource is like an object in a programming language. It has a type, a name and some properties. We write these down in YAML files.
Let's take a look at the typical structure Kubernetes uses:
apiVersion: v1
kind: Pod
metadata:
  name: my-application
  labels:
    app: company-website-app
spec:
  containers:
    - name: webserver
      image: mycompany/webserver:v1.0.0
1
2
3
4
5
6
7
8
9
10
2
3
4
5
6
7
8
9
10
apiVersion- The version of the Kubernetes API you are using to create this object.- This is a required field
- often you will see
v1which means it is the CORE APIapps/v1,extensions/v1beta1,networking.k8s.io/v1are all other APIs depending on their work domain- some resources are not yet stable so you might see
v1alpha1orv1beta1or alike. - Kubernetes will store one version of the resource in etcd and convert it to the version you are using when you request it. This allows for upgradign versions without you needing to do much!
kind- is the type of resource it is within the API versionmetadata- is data that helps uniquely identify the resource, including a name, multiple labels, and optional namespace.spec- is the specification of the desired behavior of the resource, this contains all configuration for the resource.
This format is used for all resources in Kubernetes. So we can use the same format for a Pod, Deployment, Service, Ingress, ... and so on, even for third-party resources (called Custom Resources) that any add-on may bring.
An exception is status, you will find it when you ask back a resource from Kubernetes. It is technically a "sub-resource" of the resource and contains information about the current state of the resource.
apiVersion: v1
kind: Pod
[...]
status:
  conditions:
    lastTransitionTime: "2022-10-03T08:43:55Z"
    status: "True"
    type: Ready
  containerStatuses:
  - containerID: containerd://d8378faef614be496ba8e2ab92f2f1836795f7eebd7b7dd5c5099f7ed83364b5
    image: docker.io/kindest/kindnetd:v20220726-ed811e41
    imageID: sha256:d921cee8494827575ce8b9cc6cf7dae988b6378ce3f62217bf430467916529b9
    lastState: {}
    name: kindnet-cni
    ready: true
    restartCount: 0
    started: true
    state:
      running:
        startedAt: "2022-10-03T08:43:55Z"
  hostIP: 172.20.0.2
  phase: Running
  podIP: 172.20.0.2
  podIPs:
  - ip: 172.20.0.2
  qosClass: Guaranteed
  startTime: "2022-10-03T08:43:53Z"
1
2
3
4
5
6
7
8
9
10
11
12
13
14
15
16
17
18
19
20
21
22
23
24
25
26
27
2
3
4
5
6
7
8
9
10
11
12
13
14
15
16
17
18
19
20
21
22
23
24
25
26
27
You'll never set this by hand but the system itself will update it. It is a way for Kubernetes to keep track of the current state of the resource.
Tips
You can always get the YAML spec of a resource by using the kubectl get <resource type> <name> -o yaml command.
# Intermezzo: labels

Labels, or name tags is how they are presented in the Children's Guide to Kubernetes (opens new window) (also in video (opens new window))
In Kubernetes we have different kinds of resources that belong together. It could be multiple containers, or a service which has to find which pods to route to. We can use labels to group these resources together.
metadata:
  name: my-application
  labels:
    app: company-website-app
    department: marketing
    release: stable
    version: 1.0.0
1
2
3
4
5
6
7
2
3
4
5
6
7
While this tells us more about the resource, it also allows us to select resources based on these labels.
kubectl get pods -l release=stable # get all pods with the label release=stable
1
Labels are also passed on into the resources Kubernetes creates for us.
They are often used in Label Selectors to find resources. For example, a Service can use a label selector to find the Pods it should route to.
apiVersion: v1
kind: Service
metadata:
  name: my-application
spec:
    selector:
        app: company-website-app
        release: stable
    ports:
        - protocol: TCP
        port: 80
        targetPort: 80
1
2
3
4
5
6
7
8
9
10
11
12
2
3
4
5
6
7
8
9
10
11
12
This will make sure the service links to the app company-website-app with the label release version stable.
# Kubernetes Magic?
We have a spec written in YAML, we can use kubectl to create it in our cluster. But how does Kubernetes know what to do with it?
This is a process called reconciling.
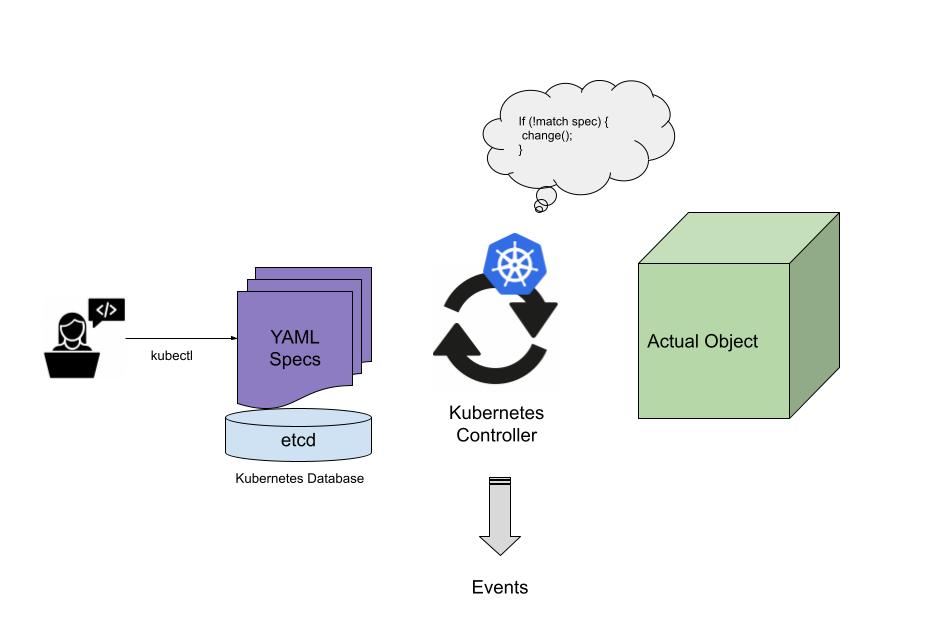
How to think of this? Well Kubernetes has a database full of YAML specs, and also access to the actual things it creates like containers.
It is in a constant infinite while loop that looks at the YAML specs and compares them to the actual object. If it doesn't exist it will create it. If it does exist it will make sure it is up to date with the spec. While doing this, it updates the status of the resource and sends out an event on what it did.
It will keep doing this process until all changes are satisfied. When reaching out to an external service like a cloud provider (eg. to request a disk) it will wait for the result in the background and will then continue the update process.
Info
If you're a developer you immediately see the flaws. This is a simplified version. In reality the underlaying database etcd (opens new window) offers something called "watchers" it will only run this code when something changes in the database. However it regulary checks if the actual state is the same as the desired state every few minutes/seconds.
# Namespaces
You will find many namespaces in Kubernetes. They are used to group resources together and isolate them if needed. It allows for a better overview when looking into the cluster.
It also is a security boundry when setting up RBAC (Role Based Access Control), you can give a user or system access to a specific namespace.
We can list namespaces and make them when needed:
kubectl get namespaces
kubectl create namespace <namespace>
1
2
2
By default you will see the default and kube-system namespace, the last one is used by Kubernetes to host it's own internal system.
We can switch namespaces using the -n flag:
kubectl -n <namespace>
1
For example you might want to list the pods per namespace:
kubectl -n kube-system get pods
kubectl -n default get pods
1
2
2
Tips
Some resources are never bound to a namespace like nodes or persistentvolumes and all resources starting with the prefix cluster.
Keep in mind these are exceptions and most resources are bound to a namespace.
# Handy aliases
You can use aliases to make your life easier. For example you can use k instead of kubectl:
alias k=kubectl
alias kp='kubectl get pods'
alias kdp='kubectl describe pod'
1
2
3
2
3
The next one is kcc, this can be used to switch the default context (cluster) and namespace:
function kcc () {
    usage () {
        echo -en "Usage: $0 <context> <namespace>\n"
    }
    result () {
        echo -en "-> Context: \e[96m$context\e[0m\n-> Namespace: \e[92m$namespace\n\e[0m"
    }
    if  [ $# -eq 0 ] ; then
        ## If no options, print the current context/cluster and namespace
        context="$(kubectl config current-context 2>/dev/null)"
        namespace="$(kubectl config view -o "jsonpath={.contexts[?(@.name==\"$context\")].context.namespace}")"
        result
    elif [ $# -eq 2 ]; then
        ## If options, assume time to set
        context="$1"
        namespace="$2"
        kubectl config use-context "$context" > /dev/null
        kubectl config set-context "$context" --namespace="$namespace" > /dev/null
        result
    else
        usage
    fi

}
1
2
3
4
5
6
7
8
9
10
11
12
13
14
15
16
17
18
19
20
21
22
23
24
2
3
4
5
6
7
8
9
10
11
12
13
14
15
16
17
18
19
20
21
22
23
24
Credits to InAnimaTe (opens new window)
This will allow you to switch the cluster and namespace in one command:
kcc kind-kind kube-system # switch to the kind cluster and the kube-system namespace
kcc kind-kind default
1
2
2
Add both these codes to your ~/.bashrc file so they are ready for use.
# What's next?
Congratulations you now know what Kubernetes is! But we're far from there yet... We need to set up a Kubernetes cluster first, from there on we can take a look at Resources and at end we will take a look at our package manager Helm.