
Systemd
2022-8-16 About 8 min
# Systemd

Every Unix system has an init system. Our init system has PID 1 which means it is the very first process to start at system boot. This therefore starts immediately after the Kernel is booted. In macOS this is launchd, every BSD also has its own system. There are also several init systems that you can use on Linux as OpenRC.
Looking at Ubuntu's choices, we have used upstart since 2006 and replaced it with systemd in 2014.
In other Linux distributions we also saw a more shifting and many distro specific configurations coming back.
In most systems, services existed as complex scripts that did a lot of functionalities themselves, because of this, writing your own service was not so convenient.
In 2010, Systemd was started as an idea to make init systems better. Systemd tries to reduce complexity and government of different scripts. It handles many things based on configuration files. Also, systemd enables parallelization of the boot process, older init systems worked sequentially in executing all boot scripts. Systemd tries to parallelize as much as possible.
We can think of systemd as an all-encompassing init system. It will not only take care of our background processes but also everything around it as network setup to running cron jobs. This seems to be a nice choice but it is also its biggest criticism, for it nullifies the Unix philosophy. Instead of combining many small tools that each do something very well, Systemd itself does everything in one code base.
For us this will have the advantage that we can find a lot of information about our server in one place!
# Structure
The structure below comes from Tizen, but gives a nice overview of Systemd's various components.
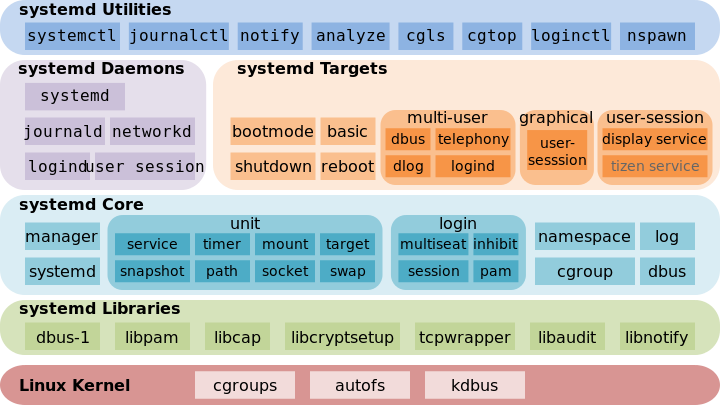
We see a couple of major groups:
Utilitiesthese are the tools we are going to use to control everythingDaemonsare background components of Systemd itself that control everything, we address these with our utilitiesTargetsare parts of the system that need to be started. We are going to use these in our services.CoreandLibrariesare the underlying foundation of Systemd.
# Use in Linux
Systemd is found in the vast majority of all Linux distributions, many adopted Systemd around the year 2015. There are also some Linux distributions that are specifically made to not have Systemd such as Devuan. Below is a list of major Linux distributions that use Systemd according to Wikipedia:

# Systemd for Linux Servers
What does this mean for us now? Throughout the course we have been using systemctl everywhere. We will now look at this in more detail!
We have 2 commands that we are going to use a lot
systemctlthis command is going to run everything from Systemd on our server.journalctlthis command is going to read and control all the logs from Systemd.
note
In many tutorials on the Internet you are going to come across the old service command. This command predates Systemd but has been used so often than Ubuntu sets up an alias that is going to forward these commands to Systemd.
Use of this is not recommended, Linux distributions that are more progressive (such as Flatcar Linux) do not have this alias (anymore).
# Installation
# I leave this title here to make a point
# Systemd is already installed
# it has just started your server
1
2
3
2
3
# Using Systemd
We are going to use different utilities in the following sections. But where did these weird names like systemctl come from?
It is a recent trend in the Linux/Server world to have a background utility, traditionally ending in d from daemon.
Look at httpd and sshd. We control these via CLI (command line interface) tools that often end in ctl from control. Examples are bluetoothctl, kubectl and systemctl.
# systemctl
We are going to use systemctl to read all the information from Systemd on our server.
First we are going to look at what is actually running in systemd?
sudo systemctl list-units
1
We get a huge list of everything running on our system. (You can save it by pressing q)
We see not only our services but more units. A unit is a component running in systemd, you recognize the type by their file extension. We look at a few of them:
.devicethese are all connected devices (also virtual).mountare all mount points of file systems.servicethese are all services- socket` are all network sockets
.timerthese are all timers (similar to Cron jobs)
In our job we focus mainly on all services, we can filter them with a simple grep:
sudo systemctl list-units | grep .service
1
# Services
We are going to use systemctl to read all the information from Systemd on our server.
First we are going to look at what is actually running in systemd?
sudo systemctl list-units
1
We get a huge list of everything running on our system. (You can save it by pressing q)
We see not only our services but more units. A unit is a component running in systemd, you recognize the type by their file extension. We look at a few of them:
.devicethese are all connected devices (also virtual).mountare all mount points of file systems.servicethese are all services- socket` are all network sockets
.timerthese are all timers (similar to Cron jobs)
In our job we focus mainly on all services, we can filter them with a simple grep:
sudo systemctl list-units | grep .service
1
$ systemctl cat nginx.service
# /lib/systemd/system/nginx.service
# Stop dance for nginx
# =======================
#
# ExecStop sends SIGSTOP (graceful stop) to the nginx process.
# If, after 5s (--retry QUIT/5) nginx is still running, systemd takes control
# and sends SIGTERM (fast shutdown) to the main process.
# After another 5s (TimeoutStopSec=5), and if nginx is alive, systemd sends
# SIGKILL to all the remaining processes in the process group (KillMode=mixed).
#
# nginx signals reference doc:
# http://nginx.org/en/docs/control.html
#
[Unit]
Description=A high performance web server and a reverse proxy server
Documentation=man:nginx(8)
After=network.target

[Service]
Type=forking
PIDFile=/run/nginx.pid
ExecStartPre=/usr/sbin/nginx -t -q -g 'daemon on; master_process on;'
ExecStart=/usr/sbin/nginx -g 'daemon on; master_process on;'
ExecReload=/usr/sbin/nginx -g 'daemon on; master_process on;' -s reload
ExecStop=-/sbin/start-stop-daemon --quiet --stop --retry QUIT/5 --pidfile /run/nginx.pid
TimeoutStopSec=5
KillMode=mixed

[Install]
WantedBy=multi-user.target
1
2
3
4
5
6
7
8
9
10
11
12
13
14
15
16
17
18
19
20
21
22
23
24
25
26
27
28
29
30
31
2
3
4
5
6
7
8
9
10
11
12
13
14
15
16
17
18
19
20
21
22
23
24
25
26
27
28
29
30
31
With this we see all the congiguration options of the service. We'll look at the subcomponents later when we scrhve our own.
We can also stop and start this background service:
sudo systemctl start nginx.service
sudo systemctl stop nginx.service
1
2
2
Or we combine it with 1 command:
sudo systemctl restart nginx.service
1
NGINX also supports "live reloading" of configuration, here we can do this:
sudo systemctl reload nginx.service
1
Are we really having problems with NGINX? Then we have the emergency solution kill this is going to kill the service in the process list.
sudo systemctl kill nginx.service # emergency brake, do not use
1
We can also control the automatic startup of our service with Systemd. With systemctl enable we can start the service automatically at server startup. With systemctl disable we can disable the service.
sudo systemctl enable nginx.service
sudo systemctl disable nginx.service
1
2
2
# Own service
In the course, we often go through our apt installation to already include a Systemd service. However, in practice we often have to write our own services for internal applications. Here we are going to use simple-service as an example. This is a small Web server that is going to give us a Web page on port 8080.
Before we can script a service we need our binary. We can download this from GitHub with wget and then unpack and install it:
wget https://github.com/meyskens/simple-service/releases/download/v1.0.0/simple-service_1.0.0_linux_amd64.tar.gz
tar xzf simple-service_1.0.0_linux_amd64.tar.gz
sudo mv simple-service /usr/local/bin/simple-service
1
2
3
2
3
Most configuration of systemd can be found in /etc/systemd/, the directory system here are a lot of services. Here we are going to write a service for our simple-service:
sudo nano /etc/systemd/system/my-service.service
1
Into this we paste the following configuration:
[Unit]
Description=My Cool Server
After=network.target
[Service]
ExecStart=/usr/local/bin/simple-service
Restart=on-failure
RestartSec=10s
[Install]
WantedBy=multi-user.target
1
2
3
4
5
6
7
8
9
2
3
4
5
6
7
8
9
We see 3 sections:
[Unit]displays all the information about this Systemd unit.Descriptionis a description of the serviceAfterdisplays what the service should start after thenetwork.target, so when the server has a network connection.
[Service]indicates that this is a service and also tells what to doExecStartis the path to the binary to runRestarttells when Systemd should restart the service.on-failurecauses the service to restart if the binary returns an error code.RestartSecis the time in seconds that the service must wait for a restart
[Install]displays all the information for the Systemd installation.WantedBydisplays what the service should be started in the targermulti-user, this runs on all Linux systems. Otherwise, the service will not start unless a system component has our service as a dependency.
note
There are a huge number of options in Systemd units. We will not discuss all of them in the course. Below are some references you can refer to:
- freedesktop.org manpage about systemd services (opens new window)
- Arch wiki about Systemd](https://wiki.archlinux.org/title/systemd)
- DigitalOcean about Systemd units](https://www.digitalocean.com/community/tutorials/understanding-systemd-units-and-unit-files)
- Flatcar documentation about Advanced Unit Files](https://www.flatcar.org/docs/latest/setup/systemd/getting-started/#advanced-unit-files)
Now that we have created our unit file, we need to ask Systemd to reload it. We do this with:
sudo systemctl daemon-reload
1
We need to run this command every time we modify a Systemd unit.
Now that we have created the service we can enable it:
sudo systemctl enable my-service.service
1
And we start the service with:
sudo systemctl start my-service.service
1
As always, we also take a quick look at the status:
sudo systemctl status my-service.service
1
And finally, we also take a quick look at the output:
curl http://localhost:8080
1
# journalctl
We have already briefly looked at logging earlier in the course. Today we find logs in two places (3 if you still count systlog) on our Linux server.
- Application specific log files, usually in
/var/log/. - Journals: these log files are written by the
systemddaemon of the system and services.
Application specific logging was often used but requires a lot of work from the server code itself. The server (such as NGINX) is responsible for writing logging as well as deleting old log files. Also, older logs are often compressed to save disk space. Most of these files can be found in /var/log/.
In this chapter we will mainly look at the Journals. These are managed by the systemd daemon. Our services just need to send simple logs to the standard output/error (opens new window) and Systemd takes care of everything for us. It will store, archive and delete them when needed.
# Viewing logs
Logs can be viewed gaam with journalctl.
sudo journalctl
1
This will show us ALL logs from the system.... now that is a little too much to be useful.
With the u option, we view the logs of a specific Systemd unit:
sudo journalctl -u my-service
1
Here we get all the logs from our application itself but also from Systemd about our service. Try restarting this one!
We can also "follow" our logs live with -f.
sudo journalctl -u my-service -f
1
These logs are a little boring, we stop them with Ctrl+C.
We'll take ssh for a moment as an example:
sudo journalctl -u ssh -f
1
Now open a 2nd termimal and log in to your server, you will notice that you can watch the login live!
# Log housekeeping
Logs do take up some space after a while, for example, my Linux laptop currently has 4GB of log files, and I'm not even running a server yet!
Journalctl can give us all the information with:
sudo journalctl --disk-usage
1
We can start cleaning this up with:
sudo journalctl --vacuum-size=1G
1
This command instructs Journald to limit the logs to 1GB. It does still allow for minimum storage of log files. On our new server, it's not going to make much difference.
We can also ask to delete old log files older than one year:
sudo journalctl --vacuum-time=1years
1
These actions can be performed manually, you can also modify the in /etc/systemd/journald.conf
We have several options:
SystemMaxUse=is the maximum size of the system log files on diskSystemMaxFileSize=is the maximum size of 1 logfile on diskRuntimeMaxUse=is the maximum size of the runtime log files on volitile media (memory)RuntimeMaxFileSize=is the maximum size of 1 logfile on volitile media
For now, we are still happy with the default values!